My gardening buddy/boyfriend planting our carrots.
Saturday, April 30, 2011
Friday, April 29, 2011
Thursday, April 28, 2011
Rainy Day Photos.
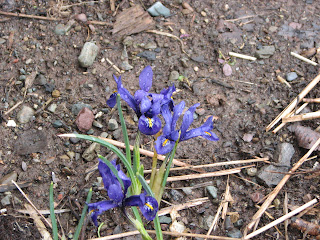
Iris Reticulata.
Siberian Squill
Glory of the Snow, needing some weeding.
Glory of the Snow planted in front of some Jonquil Daffodils.
Hyacinths just starting to show their true colours.
Wednesday, April 27, 2011
My Office View.
Lousy day for a photo, however over the weekend we planted 81 Strawberry plants outside my office window. The spot we picked receives a lot of sunshine, basically all day sun, and is fairly acidic soil due to the amount of Juniper trees growing in the woods bordering our lawn.
Tuesday, April 26, 2011
That time of the year again.
My lovely Boyfriend tilling up our lovely garden. We have planted Spring Garlic, Peas, Potatoes, Green Onions, Kale, Radishes and Spinach in the garden so far. There is some Fall Garlic poking up about 3-4 inches above the soil that we had planted at the end of August .When the Daffodils bloom we will be planting more things like Beets, Parsnips, Carrots, some Rutabaga, Lettuces, Swiss Chard, and lots more.
Monday, April 25, 2011
Tuesday, April 19, 2011
Chives!
My Chives have just emerged. I can not stop eating them raw as I am working outdoors.
I love chives raw, in salads,with potatoes, pasta or any other way I can find to use them.
I like making a slightly spicy Chive tea with the fresh sprouts. Chives are flavourful and nutrient rich and are thought to aid with digestion. One of the nicest features of Chives is that they are a perennial plant, returning every year and requiring little maintenance. You want to use the tender shoots fresh before the plant flowers. Chives are part of the allium family, flowering onions, and will produce a beautiful purple bloom that is also edible. These blooms make a lovely addition to salads or a garnish for whatever you would like.
Thursday, April 14, 2011
How to make Ghee.
Ghee, or clarified butter, is simply butter with the milk solids removed. It is widely used in Indian cooking and thought to be a healthful fat by Ayurveda medicine systems by aiding digestion and boosting the immune system when consumed in moderation. It can even be used as a massage oil. The great thing about ghee is that it can be used for high heat cooking unlike other healthful oils such as olive, hemp or flax. With the milk solids removed the ghee has a high smoke point and a rich, flavourful buttery taste, making it my choice cooking oil for using over heat. If made properly ghee could potentially last forever.
Ghee is extremely easy to make at home. You can make as much or as little as you would like. Relatively inexpensive, about 8 dollars for 800 ml, I usually start out with 2 pounds of unsalted butter.
(Only one pound of butter in this picture, I made a 1/2 batch)
You melt the butter over low/med heat, I usually keep my burner on about 3 or 4, then slowly simmer and boil for about a half an hour.
See that white stuff on top? You continuously scrape that off, that is the milk solids, and discard or save for a snack for your chickens. Once the butter has been slowly simmering for about a half an hour you will notice less and less milk solids on top and some starting to form on the bottom of the pan. The butter starts to smell almost like toffee when it's done. You simply gently cool, no stirring, until it is cool enough to strain.
Milk solids for the Girls.
Strain Ghee through cheese-cloth or coffee filter.
Store and use. A jar works well. Store out of direct light and heat.
Enjoy!
More Signs of Spring.
Snow Crocus
Snow Crocus
Chionodoxa, Glory of the Snow.
Kitty on a hot cold frame.
Asparagus, Onions etc.
Garden clean up. I need to do the ditches in front of my house now.
Monday, April 11, 2011
How to Make Easter Eggs and Keep the Egg.
I decided to make a few Easter Eggs this weekend since we were making scrambled eggs. In order to keep both the shell and the egg I would have to blow the egg from the shell. Make a small hole in the top and a slightly larger hole in the bottom of the egg using a large sewing needle. Take the needle and insert it into the bottom hole of the egg and try to break the yolk up the best you can. Clean away any egg shell shards and raw egg from the surface of the shell, you are going to have to put your mouth on the top of the egg. Making a seal as tight as you are able to on the top of the egg, start to gently blow the egg out of the shell. You can always get your children to help with this part.
Here is my boyfriend just getting one started.
The yolk is the tricky part.
The End.
Friday, April 8, 2011
Signs of Spring.
Yellow Snow Crocus.
Pokey Purple Snow Crocus, hopefully I will catch them open this afternoon.
Kitty, Myrtle, rolling around in the morning sun.
Chickens Contained.
Arugula, Spinach, Shallots, Red Onions, Yellow Onions, Leeks and Broccoli.
Cold Frame.
Subscribe to:
Comments (Atom)


